

From Zero to Green: Automating a Production-Ready, Secured 3-Node Elasticsearch Cluster
Chapter 1: Architecture & Design
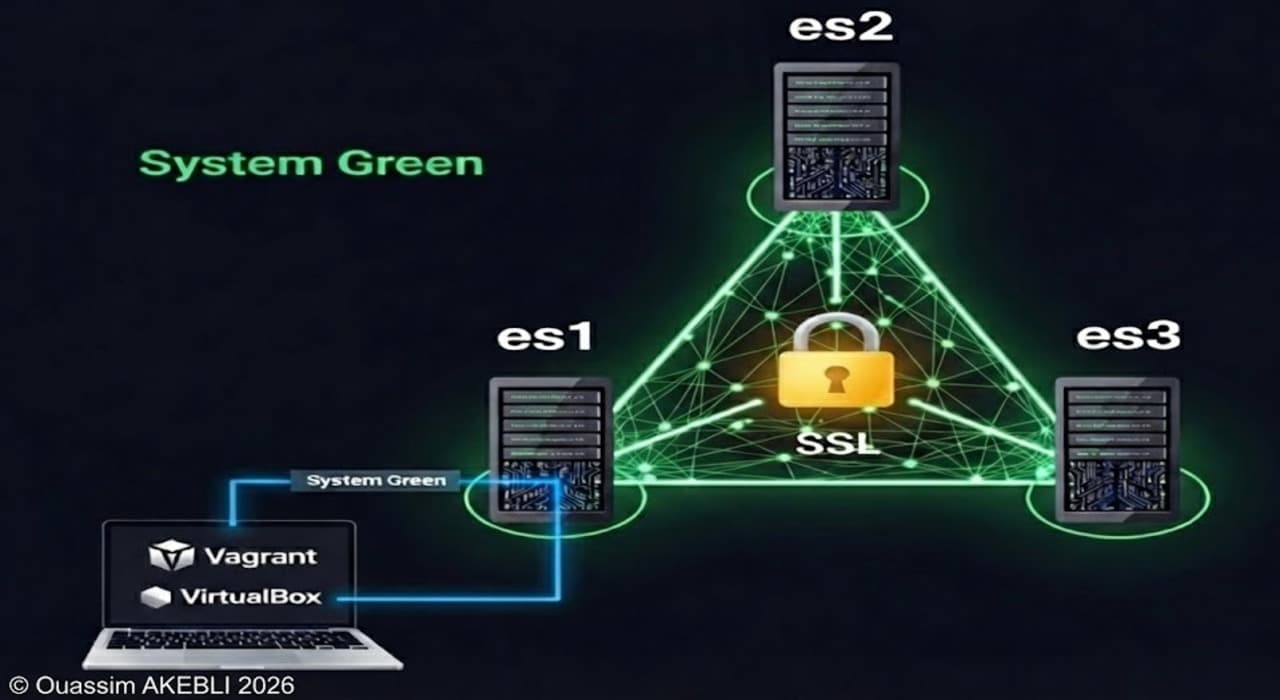
Before writing a single line of code, we must understand the "Physical" and "Logical" layout of the cluster we are building, This project deploys a hyper-converged, 3-node Elasticsearch cluster using Vagrant and VirtualBox. The infrastructure simulates a production environment with dedicated networks, storage partitioning, and full SSL security.
1.1 Environment Specification
| Component | Specification | Details |
| OS Base | Ubuntu 22.04 LTS (Jammy64) | Standardized base box. |
| Compute | 3 Nodes (es1, es2, es3) | 4 GB RAM, 2 vCPUs per node. |
| Storage | 15GB Dedicated LVM Disk | Partitioned for /mnt (System), home, data, logs, and backup. |
| Network | Dual Interface | NAT (Mgmt/SSH) + Host-Only (Cluster Traffic 192.168.56.x). |
| Software | Elasticsearch 9.3.0 | Manual Tarball Installation (Archive). |
| Security | xPack Security Enabled | Full SSL/TLS for Inter-node (Transport) and Client (HTTP) traffic. |
1.2 Logical Architecture
This diagram illustrates the physical layout of the cluster. It highlights the "Hub-and-Spoke" network topology where all nodes connect via a private Virtual Switch, and the Storage Architecture where es1 acts as the central NFS repository for backups.
1.3 Provisioning Workflow
The deployment is orchestrated via 12 modular shell scripts. This diagram details the execution flow, specifically the critical Phase 3 (Script 09) where nodes synchronize via the NFS share to securely generate and distribute SSL certificates without manual intervention.
Chapter 2: Lab Setup & Deployment
Now that we understand the design, let's build it. We will use PowerShell to create the script files instantly.
2.1 Prerequisites
Ensure you have the following installed on your host machine:
- VirtualBox (Version 7.0 or higher recommended)
- Vagrant (Version 2.4 or higher)
- PowerShell (Standard on Windows, or pwsh on Mac/Linux)
2.2 Initialize the Lab
Open your PowerShell terminal and run the following commands to create a clean workspace:
mkdir lab_elasticsearch
cd lab_elasticsearch
2.3 Generate Provisioning Scripts & Technical Script Breakdown
The Vagrantfile (Orchestrator)
This file defines the 3 VMs, sets their IPs, RAM, and CPUs, and tells Vagrant to run the 13 shell scripts in order.
@'
Vagrant.configure("2") do |config|
  # UPDATED: Changed to Noble (24.04) to match your requested package versions
  config.vm.box = "ubuntu/jammy64"

  (1..3).each do |i|
    config.vm.define "es#{i}" do |node|
      node.vm.hostname = "es#{i}"
      node.vm.network "private_network", ip: "192.168.56.#{10+i}"

      # Hardware: 15GB Disk + 2GB RAM
      node.vm.disk :disk, size: "15GB", name: "extra_storage"

      node.vm.provider "virtualbox" do |vb|
        vb.memory = "4096"
        vb.cpus = 2
      end

      node.vm.provision "packages", type: "shell", path: "01-packages.sh"
      node.vm.provision "user", type: "shell", path: "02-user.sh"
      node.vm.provision "memlock", type: "shell", path: "03-config.sh"
      node.vm.provision "file_structure", type: "shell", path: "04-storage.sh"
      node.vm.provision "swap", type: "shell", path: "05-swap.sh"
      node.vm.provision "nfs", type: "shell", path: "06-nfs.sh"
      node.vm.provision "network", type: "shell", path: "07-network.sh"
      node.vm.provision "install", type: "shell", path: "08-install.sh"
      node.vm.provision "certs", type: "shell", path: "09-certs.sh"
      node.vm.provision "keystore", type: "shell", path: "10-keystore.sh"
      node.vm.provision "service", type: "shell", path: "11-service.sh"
      node.vm.provision "es_config", type: "shell", path: "12-configure-cluster.sh"
      node.vm.provision "sudoers", type: "shell", path: "13-sudoers.sh"

    end
  end
end
'@ | Set-Content -Path "Vagrantfile"
Phase 1: Foundation (Scripts 01-05)
This phase establishes a standardized OS environment tuned specifically for high-performance database workloads.
01-packages.sh: Installs essential system utilities.lvm2andxfsprogsare required for the storage layer.libuserallows advanced user management. TheDEBIAN_FRONTEND=noninteractiveflag prevents the script from hanging on user prompts.
@'
#!/bin/bash
set -e

export DEBIAN_FRONTEND=noninteractive
apt-get update -y

apt-get install -y libuser acl tar lvm2 xfsprogs wget net-tools
'@ | Set-Content -Path "01-packages.sh"
02-user.sh(Identity): Creates theelasticsearchuser with a fixed UID (1122) and GID (1122).- Why Fixed IDs? Since we are using NFS, the numeric User ID must match on all 3 servers. If
es1writes a file as user 1001 andes2reads it as user 1002, permission errors will occur.
- Why Fixed IDs? Since we are using NFS, the numeric User ID must match on all 3 servers. If
@'
#!/bin/bash
set -e

# Create Group
if ! getent group elasticsearch >/dev/null; then
    groupadd -g 1122 -r elasticsearch
fi

# Create User
if ! id -u elasticsearch >/dev/null 2>&1; then
    useradd -u 1122 -g 1122 -r -s /bin/bash -m -d /home/elasticsearch elasticsearch
fi
'@ | Set-Content -Path "02-user.sh"
03-config.sh(Kernel Tuning): Applies critical sysctl settings.vm.max_map_count=262144: Required for Lucene (the search engine core) to usemmapfsfor efficient index access. Without this, Elasticsearch will not boot.limits.conf: Increases file descriptors to 65535, as databases hold thousands of files open simultaneously.
@'
#!/bin/bash
set -e

# set limits
cat <<EOF > /etc/security/limits.d/elasticsearch.conf
elasticsearch   -       nofile      65535
elasticsearch   hard    memlock     unlimited
elasticsearch   soft    memlock     unlimited
elasticsearch   -       nproc       4096
EOF

# set sysctl
cat <<EOF > /etc/sysctl.d/elasticsearch.conf
vm.max_map_count=262144
EOF

# Apply sysctl immediately
sysctl --system
'@ | Set-Content -Path "03-config.sh"
04-storage.sh(LVM Partitioning): Formats the raw 15GB disk into a Logical Volume Manager (LVM) groupvg01. It creates separate partitions for Home, Data, Logs, and Backups formatted with XFS (optimized for large file handling). This separation prevents a runaway log file from crashing the database by filling the data disk.
@'
#!/bin/bash
set -e

# Create VG01
if ! vgs vg01 >/dev/null 2>&1; then
    DISK=$(lsblk -dn -o NAME,SIZE | grep '15G' | awk '{print "/dev/"$1}')
    pvcreate $DISK
    vgcreate vg01 $DISK
fi

# Helper to create LV and Format XFS
create_lv() {
    local size=$1
    local name=$2
    if ! lvs vg01/$name >/dev/null 2>&1; then
        lvcreate -L $size -n $name vg01
        mkfs.xfs /dev/vg01/$name
    fi
}

# Create LVs
create_lv 2G mnt
create_lv 4G data
create_lv 2G home
create_lv 1G logs
create_lv 4G backup

# Mount hierarchy
mount_and_fstab() {
    local lv=$1
    local path=$2

    mkdir -p $path
    if ! grep -q "$path " /proc/mounts; then
        mount /dev/vg01/$lv $path
        echo "/dev/vg01/$lv $path xfs defaults 0 0" >> /etc/fstab
    fi
}

# Mount /mnt
mount_and_fstab mnt "/mnt"

# Create subfolders
mkdir -p /mnt/elasticsearch/data
mkdir -p /mnt/elasticsearch/home
mkdir -p /mnt/elasticsearch/logs
mkdir -p /mnt/elasticsearch/backup

# Mount the sub-volumes
mount_and_fstab data   "/mnt/elasticsearch/data"
mount_and_fstab home   "/mnt/elasticsearch/home"
mount_and_fstab logs   "/mnt/elasticsearch/logs"
mount_and_fstab backup "/mnt/elasticsearch/backup"

# Fix Permissions
chown -R 1122:1122 /mnt/elasticsearch

lsblk
'@ | Set-Content -Path "04-storage.sh"
05-swap.sh(Performance): Permanently disables swap memory. If the OS swaps Elasticsearch memory to disk, performance degrades instantly and can cause Garbage Collection pauses that disconnect the node from the cluster.
@'
#!/bin/bash
set -e

# Turn off swap immediately
swapoff -a

# Remove swap entry from /etc/fstab so it stays off after reboot
sed -i '/swap/s/^/#/' /etc/fstab

# Verify
if [ $(swapon --show | wc -l) -eq 0 ]; then
    echo "Swap is disabled."
else
    echo "Swap might still be active."
    swapon --show
fi
'@ | Set-Content -Path "05-swap.sh"
Phase 2: Infrastructure (Scripts 06-08)
This phase builds the network and storage plumbing required for clustering.
06-nfs.sh(Shared Storage):- On ES1: Installs
nfs-kernel-serverand exports the/mnt/elasticsearch/backuppartition. - On ES2/3: Installs
nfs-commonand mounts that export. This allows all nodes to see the same "Snapshot Repository," enabling the entire cluster to back up data to a single location.
- On ES1: Installs
@'
#!/bin/bash
set -e

HOSTNAME=$(hostname)
NFS_SERVER_IP="192.168.56.11"
SHARE_PATH="/mnt/elasticsearch/backup"

# SERVER CONFIG (Only on es1)
if [ "$HOSTNAME" == "es1" ]; then

    apt-get update -y
    apt-get install -y nfs-kernel-server

    # Permission Check
    chown 1122:1122 "$SHARE_PATH"
    chmod 775 "$SHARE_PATH"

    # Configure Exports
    if ! grep -q "$SHARE_PATH" /etc/exports; then
        echo "$SHARE_PATH 192.168.56.0/24(rw,sync,no_subtree_check,no_root_squash)" >> /etc/exports
    fi

    exportfs -a
    systemctl restart nfs-kernel-server

    # Verify
    touch "$SHARE_PATH/verify_nfs.txt"

# CLIENT CONFIG (Only on es2 & es3)
else

    apt-get update -y
    apt-get install -y nfs-common

    mkdir -p "$SHARE_PATH"
    chown 1122:1122 "$SHARE_PATH"

    # Check if NFS is already mounted
    if ! grep -q "$NFS_SERVER_IP:$SHARE_PATH" /proc/mounts; then
        mount "$NFS_SERVER_IP:$SHARE_PATH" "$SHARE_PATH"
        echo "$NFS_SERVER_IP:$SHARE_PATH $SHARE_PATH nfs defaults 0 0" >> /etc/fstab
    fi
fi
'@ | Set-Content -Path "06-nfs.sh"
07-network.sh(Interface Naming): Identifies the secondary network card (enp0s8usually) and renames it toprodusing systemd link rules. This guarantees that our configuration files (network.host: _prod_) will always find the correct interface, regardless of how VirtualBox assigns PCI slots.
@'
#!/bin/bash
set -e
echo "--- Renaming Interface enp0s8 to prod ---"

CURRENT_NAME="enp0s8"
NEW_NAME="prod"

# Check if rename is already done
if ip link show "$NEW_NAME" >/dev/null 2>&1; then
    exit 0
fi

# Get the MAC address of the current interface
if [ -d "/sys/class/net/$CURRENT_NAME" ]; then
    MAC=$(cat /sys/class/net/$CURRENT_NAME/address)
else
    exit 1
fi

# Create persistent Systemd Link Rule
cat <<EOF > /etc/systemd/network/10-rename-prod.link
[Match]
MACAddress=$MAC

[Link]
Name=$NEW_NAME
EOF

# Update Netplan Configuration
sed -i "s/$CURRENT_NAME/$NEW_NAME/g" /etc/netplan/*.yaml

# Apply Changes Immediately
# We can safely down this interface because Vagrant uses enp0s3 (NAT) for SSH.
ip link set $CURRENT_NAME down
ip link set $CURRENT_NAME name $NEW_NAME
ip link set $NEW_NAME up

# Apply Netplan to bind the IP to the new name
netplan apply

#ip addr show $NEW_NAME
'@ | Set-Content -Path "07-network.sh"
08-install.sh(Software): Downloads the official Elasticsearch 9.3.0 tarball and extracts it to/mnt/elasticsearch/home. We use the tarball method (instead ofapt) for total control over the installation directory structure.
@'
#!/bin/bash
set -e
echo "--- Downloading and Installing Elasticsearch ---"

URL="https://artifacts.elastic.co/downloads/elasticsearch/elasticsearch-9.3.0-linux-x86_64.tar.gz"
TMP_FILE="/tmp/elasticsearch.tar.gz"
DEST_DIR="/mnt/elasticsearch/home"

# Download
wget -q -O "$TMP_FILE" "$URL"

# Extract
tar -xzf "$TMP_FILE" -C "$DEST_DIR" --strip-components=1

# Cleanup
rm -f "$TMP_FILE"

# Permission Fix
chown -R 1122:1122 "$DEST_DIR"

'@ | Set-Content -Path "08-install.sh"
Phase 3: Security & Identity (Scripts 09-10)
This is the most complex phase, handling the "Chicken and Egg" problem of distributing security certificates in an automated environment.
09-certs.sh(Certificate Authority):- Synchronization Barrier: The script uses the NFS share as a "Dead Drop."
es1generates a Certificate Authority (CA).es2andes3enter awhileloop, pausing execution until they see the CA file appear on the shared drive. - Generation: Once the CA is available, each node generates its own
node.p12certificate signed by that CA. - Cleanup: The last node to finish deletes the CA file from the share to ensure the master key is not left exposed.
- Synchronization Barrier: The script uses the NFS share as a "Dead Drop."
@'
#!/bin/bash
set -e

ES_HOME="/mnt/elasticsearch/home"
CERT_TOOL="$ES_HOME/bin/elasticsearch-certutil"
NFS_PATH="/mnt/elasticsearch/backup"
LOCAL_CERTS="$ES_HOME/config/certs"
HOSTNAME=$(hostname)

# IP Calc
NODE_NUM=$(echo $HOSTNAME | tr -dc '0-9')
NODE_IP="192.168.56.$((10 + NODE_NUM))"

# --- CA GENERATION (es1 only) ---
if [ "$HOSTNAME" == "es1" ]; then
    if [ ! -f "$NFS_PATH/elastic-stack-ca.p12" ]; then
        $CERT_TOOL ca --out "$NFS_PATH/elastic-stack-ca.p12" --pass ""
    fi
    chmod 777 "$NFS_PATH/elastic-stack-ca.p12"
fi

# --- CERT GENERATION ---
while [ ! -f "$NFS_PATH/elastic-stack-ca.p12" ]; do sleep 2; done

mkdir -p "$LOCAL_CERTS"

# UPDATED NAME: node.p12
if [ ! -f "$LOCAL_CERTS/node.p12" ]; then
    $CERT_TOOL cert \
        --ca "$NFS_PATH/elastic-stack-ca.p12" \
        --ca-pass "" \
        --out "$LOCAL_CERTS/node.p12" \
        --pass "" \
        --name "$HOSTNAME" \
        --dns "$HOSTNAME,localhost" \
        --ip "$NODE_IP,127.0.0.1"
fi

chown -R 1122:1122 "$LOCAL_CERTS"
chmod 600 "$LOCAL_CERTS/node.p12"
chmod 700 "$LOCAL_CERTS"

# --- CLEANUP ---
touch "$NFS_PATH/$HOSTNAME.cert_done"
DONE_COUNT=$(find "$NFS_PATH" -maxdepth 1 -name "*.cert_done" | wc -l)

if [ "$DONE_COUNT" -ge 3 ]; then
    rm -f "$NFS_PATH/elastic-stack-ca.p12"
    rm -f "$NFS_PATH"/*.cert_done
    rm -f "$NFS_PATH"/*.txt
fi
'@ | Set-Content -Path "09-certs.sh"
10-keystore.sh(Secret Management): Elasticsearch stores sensitive passwords in a secureelasticsearch.keystorefile. This script adds the SSL passwords (empty strings in this lab context) to the keystore. It uses a clever input redirection trick (< $PASS_FILE) to feed passwords into the command, preventing Java from crashing in the headless Vagrant terminal.
@'
#!/bin/bash
set -e
echo "--- Setup Keystore ---"

ES_HOME="/mnt/elasticsearch/home"
KEYSTORE_BIN="$ES_HOME/bin/elasticsearch-keystore"
PASS_FILE="/tmp/keystore_pass"

# Create a temp file with a NEWLINE
echo "" > "$PASS_FILE"

# Create Keystore
if [ ! -f "$ES_HOME/config/elasticsearch.keystore" ]; then
    $KEYSTORE_BIN create
fi

# Add Keys function
add_key() {
    local key_name=$1
    if ! $KEYSTORE_BIN list | grep -q "$key_name"; then
        $KEYSTORE_BIN add --stdin --force "$key_name" < "$PASS_FILE"
    fi
}

# Add Transport Layer Passwords
add_key "xpack.security.transport.ssl.keystore.secure_password"
add_key "xpack.security.transport.ssl.truststore.secure_password"

# Add HTTP Layer Passwords
add_key "xpack.security.http.ssl.keystore.secure_password"
add_key "xpack.security.http.ssl.truststore.secure_password"

# Cleanup & Permissions
rm -f "$PASS_FILE"

chown 1122:1122 "$ES_HOME/config/elasticsearch.keystore"
chmod 600 "$ES_HOME/config/elasticsearch.keystore"

'@ | Set-Content -Path "10-keystore.sh"
Phase 4: Service & Cluster (Scripts 11-12)
The final phase configures the application and boots the cluster.
11-service.sh(Systemd Integration): Creates asystemdunit file to manage Elasticsearch as a background service. We useType=simplebecause it is the most robust method for tarball installations, avoiding timeout issues often seen withType=notify.
@'
#!/bin/bash
set -e

# Variables
SERVICE_FILE="/etc/systemd/system/elasticsearch.service"
ES_HOME="/mnt/elasticsearch/home"
ES_CONF="$ES_HOME/config"
USER="elasticsearch"
GROUP="elasticsearch"

# Create the Systemd Unit File

cat <<EOF > $SERVICE_FILE
[Unit]
Description=Elasticsearch
Documentation=https://www.elastic.co
Wants=network-online.target
After=network-online.target

[Service]
Type=simple
RuntimeDirectory=elasticsearch
PrivateTmp=true

# Environment Variables
Environment=ES_HOME=$ES_HOME
Environment=ES_PATH_CONF=$ES_CONF
Environment=PID_DIR=/run/elasticsearch

# Execution
WorkingDirectory=$ES_HOME
User=$USER
Group=$GROUP
ExecStart=$ES_HOME/bin/elasticsearch -p /run/elasticsearch/elasticsearch.pid --quiet

# Logging
StandardOutput=journal
StandardError=inherit

# Resource Limits
LimitNOFILE=65535
LimitNPROC=4096
LimitAS=infinity
LimitFSIZE=infinity
LimitMEMLOCK=infinity

# Timeouts
TimeoutStartSec=75
TimeoutStopSec=0
KillSignal=SIGTERM
KillMode=process
SendSIGKILL=no
SuccessExitStatus=143

[Install]
WantedBy=multi-user.target
EOF

# Set Kernel Parameters
SYSCTL_FILE="/etc/sysctl.d/99-elasticsearch.conf"
if [ ! -f "$SYSCTL_FILE" ]; then
    echo "vm.max_map_count=262144" > "$SYSCTL_FILE"
    sysctl -p "$SYSCTL_FILE"
fi

# Reload Systemd and Enable
systemctl daemon-reload
systemctl enable elasticsearch

# Check Status
systemctl status elasticsearch --no-pager | grep "Loaded:"
'@ | Set-Content -Path "11-service.sh"
12-configure-cluster.sh(Bootstrap): Writes the finalelasticsearch.ymlandjvm.options.- Heap: Sets
-Xms2g -Xmx2g(50% of RAM). - Discovery: Lists all 3 IPs so nodes can find each other.
- Binding:
network.host: [_local_, "_prod_"]forces the node to listen on the specific internal interface we configured, securing it from the public internet. - Security: Enables
xpack.securityand points to the certificates generated in Script 09.
- Heap: Sets
@'
#!/bin/bash
set -e
echo "--- Configuring Elasticsearch Cluster & JVM ---"

# Variables
ES_HOME="/mnt/elasticsearch/home"
CONFIG_DIR="$ES_HOME/config"
YML_FILE="$CONFIG_DIR/elasticsearch.yml"
JVM_FILE="$CONFIG_DIR/jvm.options.d/heap.options"
HOSTNAME=$(hostname)

# JVM HEAP CONFIGURATION
cat <<EOF > $JVM_FILE
-Xms2g
-Xmx2g
EOF
chown 1122:1122 $JVM_FILE

# ELASTICSEARCH.YML CONFIGURATION

cat <<EOF > $YML_FILE
# --- Cluster & Node ---
cluster.name: es-cluster
node.name: ${HOSTNAME}

# --- Paths ---
path.data: /mnt/elasticsearch/data
path.logs: /mnt/elasticsearch/logs
path.repo: ["/mnt/elasticsearch/backup"]

# --- Network ---
network.host: [_local_, "_prod_"]
http.port: 9200

# --- Discovery ---
discovery.seed_hosts: ["192.168.56.11", "192.168.56.12", "192.168.56.13"]
cluster.initial_master_nodes: ["es1", "es2", "es3"]

# --- Memory ---
bootstrap.memory_lock: true

# --- Safety ---
action.destructive_requires_name: true

# --- Security (xPack) ---
xpack.security.enabled: true

# Transport Layer
xpack.security.transport.ssl.enabled: true
xpack.security.transport.ssl.verification_mode: certificate
xpack.security.transport.ssl.keystore.path: certs/node.p12
xpack.security.transport.ssl.truststore.path: certs/node.p12

# HTTP Layer
xpack.security.http.ssl.enabled: true
xpack.security.http.ssl.keystore.path: certs/node.p12
xpack.security.http.ssl.truststore.path: certs/node.p12
EOF

# Secure the config file
chown 1122:1122 $YML_FILE
chmod 660 $YML_FILE

# RESTART SERVICE

# We perform a reload/restart to apply the changes
systemctl restart elasticsearch

# Wait and Check Health
sleep 15
if systemctl is-active --quiet elasticsearch; then
    PROD_IP=$(ip -4 addr show prod | grep -oP '(?<=inet\s)\d+(\.\d+){3}')
    echo "SUCCESS: Elasticsearch is running on $HOSTNAME binding to prod ($PROD_IP)"
else
    exit 1
fi
'@ | Set-Content -Path "12-configure-cluster.sh"
13-sudoers.sh(Service Management): Grants theelasticsearchuser specificsudoprivileges to start, stop, restart, and check the status of theelasticsearchservice without requiring a password. This allows for automated maintenance scripts or easier manual intervention without needing root access.
@'
#!/bin/bash
set -e

SUDO_FILE="/etc/sudoers.d/elasticsearch"

# Allow systemctl commands without password
cat <<EOF > $SUDO_FILE
elasticsearch ALL=(root) NOPASSWD: /usr/bin/systemctl start elasticsearch.service
elasticsearch ALL=(root) NOPASSWD: /usr/bin/systemctl stop elasticsearch.service
elasticsearch ALL=(root) NOPASSWD: /usr/bin/systemctl restart elasticsearch.service
elasticsearch ALL=(root) NOPASSWD: /usr/bin/systemctl status elasticsearch.service
elasticsearch ALL=(root) NOPASSWD: /usr/bin/systemctl status elasticsearch
EOF

# Strict permissions are required for sudoers files
chmod 0440 $SUDO_FILE
'@ | Set-Content -Path "13-sudoers.sh"
2.4 Deploy the Cluster
Start the deployment. Vagrant will bring up the VMs in parallel and execute the 12 scripts on each.
vagrant up
Note: This process will take approximately 5-10 minutes depending on your internet connection speed (downloading the 600MB Elasticsearch tarball).
Chapter 3: Verification & Expected Results
Once vagrant up completes, you should verify that your cluster is healthy, secure, and functioning as designed.
3.1 Terminal Output Check
At the very end of the deployment logs in your PowerShell window, you should see the success message from Script 12 for each node:
es1: SUCCESS: Elasticsearch is running on es1 binding to prod (192.168.56.11)es2: SUCCESS: Elasticsearch is running on es2 binding to prod (192.168.56.12)es3: SUCCESS: Elasticsearch is running on es3 binding to prod (192.168.56.13)
3.2 Service Validation
Login to the first node to perform internal checks.
vagrant ssh es1
Once inside, run the following to confirm the service status:
sudo -iu elasticsearch
sudo systemctl status elasticsearch
Expected Result:
You should see Active: active (running) and the memory usage should be close to 2GB (due to bootstrap.memory_lock).
3.3 Cluster Health Check (SSL Verification)
Since we enabled security, we must use HTTPS and authenticate. Use the built-in elastic superuser. Since we haven't set a password yet, we will reset it first to something we know (e.g., 123456), then check the health.
# 1. Reset password
/mnt/elasticsearch/home/bin/elasticsearch-reset-password -u elastic -i

# (Type '123456' when prompted)

# 2. Check Cluster Health
export ELAS_PASS='123456'
curl -k -u elastic:$ELAS_PASS "https://192.168.56.11:9200/_cluster/health?pretty"
Expected Result:
{
  "cluster_name" : "es-cluster",
  "status" : "green",
  "timed_out" : false,
  "number_of_nodes" : 3,
  "number_of_data_nodes" : 3,
  "active_primary_shards" : 3,
  "active_shards" : 6,
  "relocating_shards" : 0,
  "initializing_shards" : 0,
  "unassigned_shards" : 0,
  "unassigned_primary_shards" : 0,
  "delayed_unassigned_shards" : 0,
  "number_of_pending_tasks" : 0,
  "number_of_in_flight_fetch" : 0,
  "task_max_waiting_in_queue_millis" : 0,
  "active_shards_percent_as_number" : 100.0
}
- Status: Green means all nodes are online and talking to each other.
- Number of nodes: 3 confirms
es2andes3joined successfully.
3.4 NFS Storage Verification
Verify that the NFS share is mounted correctly on the worker nodes.
# Still inside es1, exit back to host
exit

# Login to es2
vagrant ssh es2

# Check disk mounts
sudo -iu elasticsearch
df -h | grep backup
Expected Result:
192.168.56.11:/mnt/elasticsearch/backup 4.0G 61M 4.0G 2% /mnt/elasticsearch/backup
This confirms that es2 is effectively using the disk space of es1 for its snapshot repository.
Conclusion
Congratulations! You have successfully engineered a platform, not just installed software.
By following this guide, you have moved beyond simple "Hello World" tutorials and built a Production-Grade Infrastructure that mimics real-world enterprise environments.
What you have achieved:
- True High Availability: A 3-node cluster that can survive the loss of a server without losing data.
- Hardened Security: Full SSL encryption on the Transport layer (Node-to-Node) and HTTP layer (Client-to-Node), protecting your data from the start.
- Professional Storage: A tiered LVM storage strategy that protects your OS from log floods and enables snapshots via NFS.
- Zero-Touch Automation: A reusable Vagrant template that spins up identical, clean environments in minutes, perfect for testing upgrades or training new team members.
Your cluster is now ready for data ingestion, Kibana integration, or experimenting with complex sharding strategies. You have built a solid foundation—now go build something amazing on top of it.